
 |
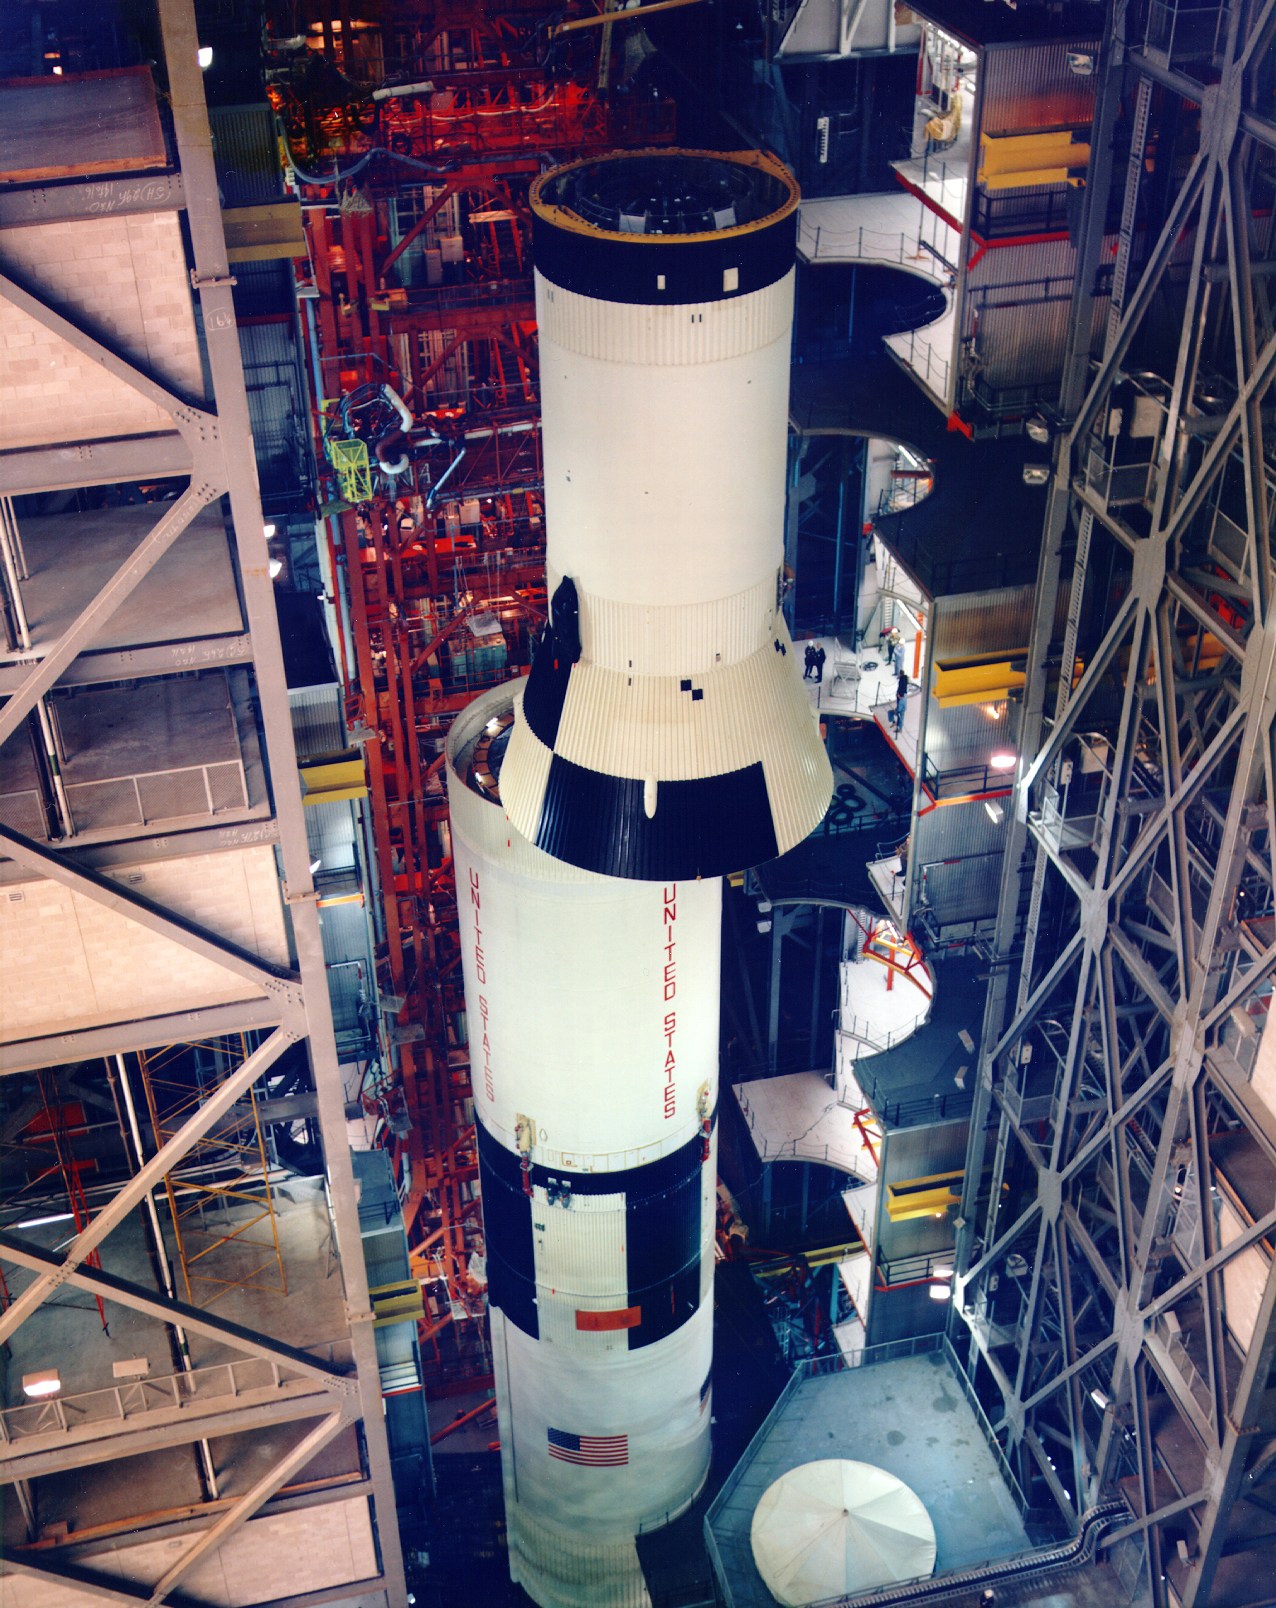
AP10-69-H-64HR S-II Saturn V second stage is hoisted by crane in the VAB. Image credit: NASA |
 |
AP10-69-H-384 CSM/SLA combination during spacecraft processing in the VAB. (ALSJ) Image credit: NASA |
 |
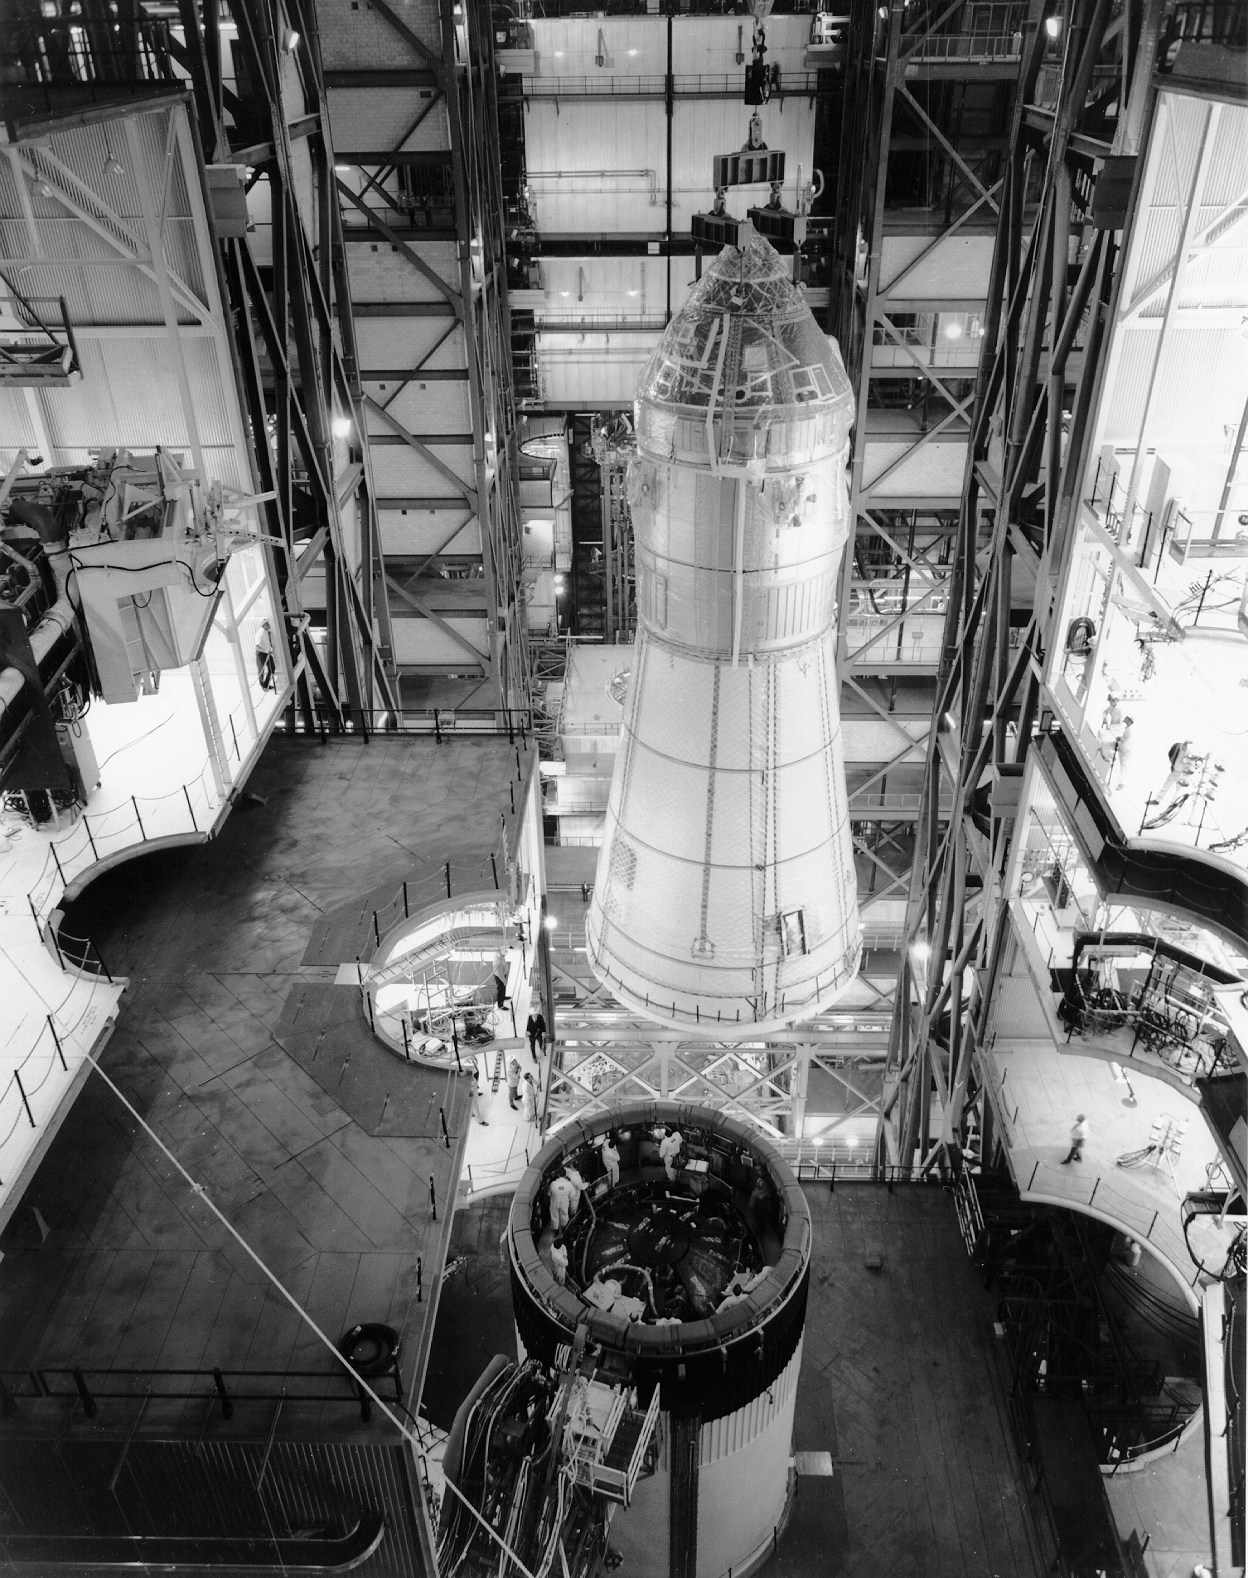
AP10-69-H-386HR CSM/LM/SLA combination is lowered into place atop the S-IVB/IU in the VAB. Image credit: NASA |
 |
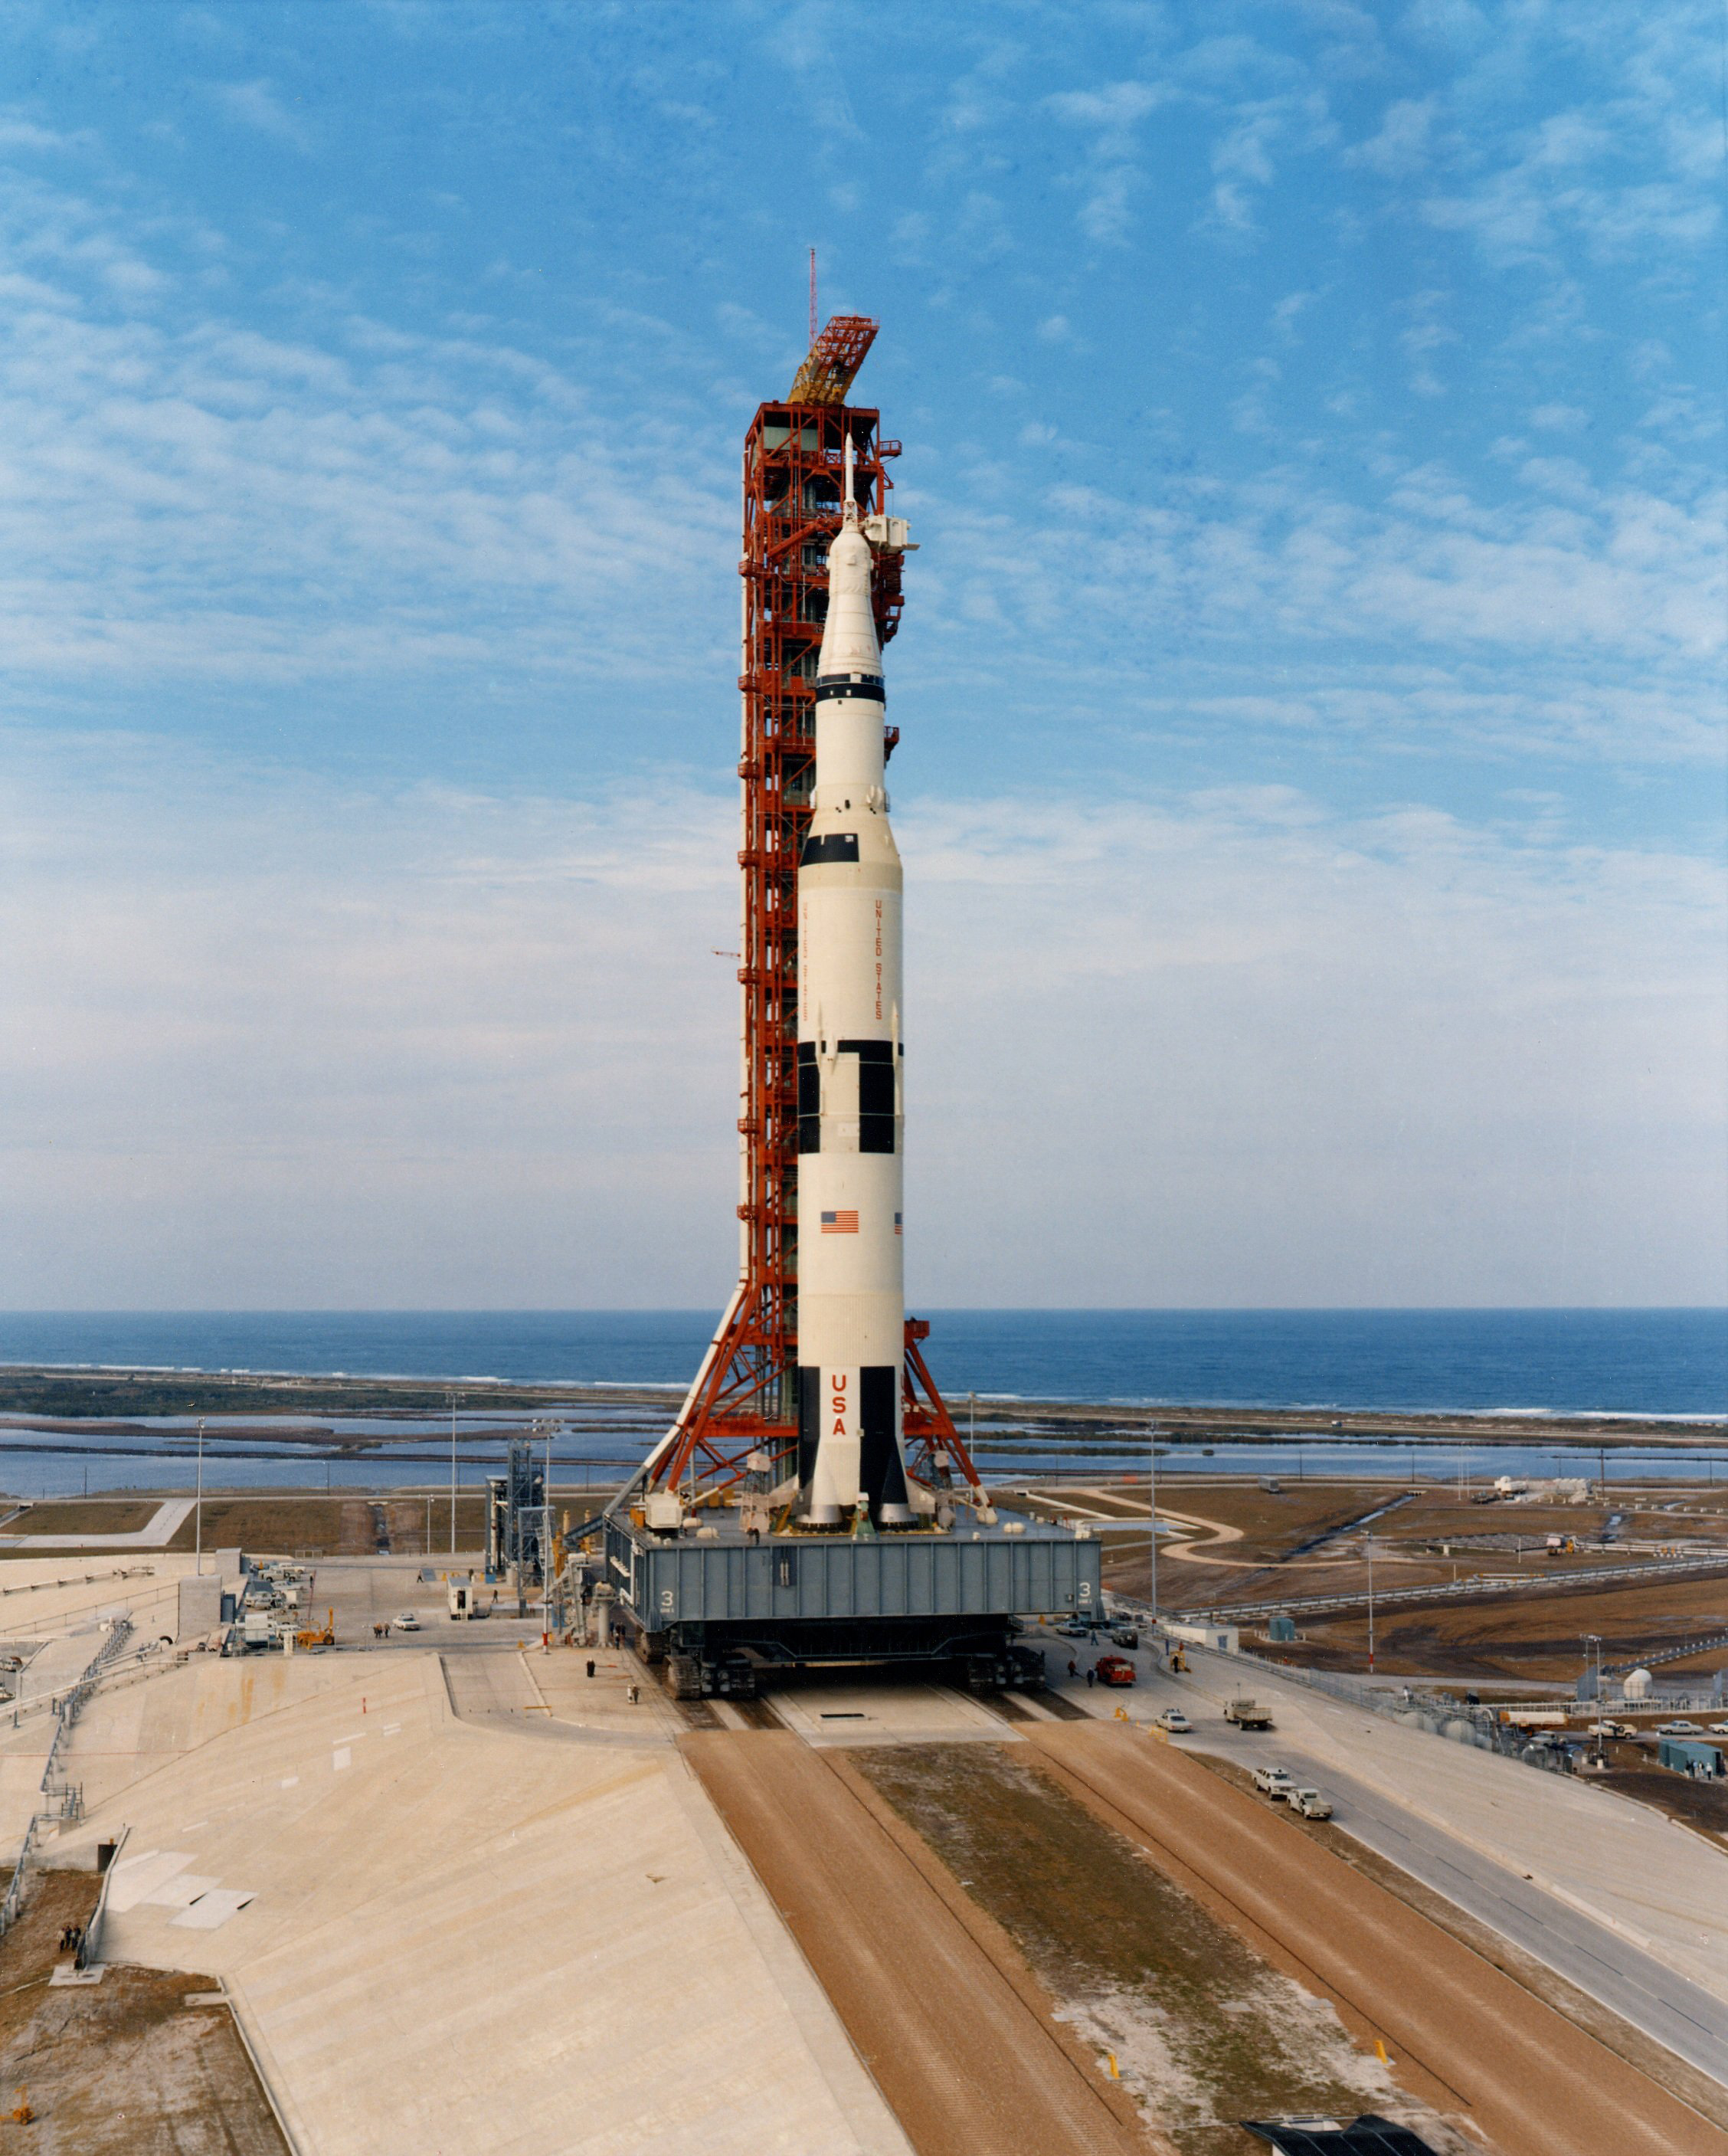
AP10-69-H-433HR Saturn V begins journey to Pad 39B at KSC. Image credit: NASA |
 |
AP10-69-H-434HR Saturn V passes in front on the VAB on its journey to Pad 39B at KSC. Image credit: NASA |
 |
AP10-69-H-435HR Saturn V journey's along the crawlerway enroute to Pad 39B at KSC. Image credit: NASA |
 |
AP10-69-H-438HR Saturn V approaches the left turn to Pad 39B at KSC. Image credit: NASA |
 |
AP10-69-H-573HR Apollo 10 flight crew pose in front of the spacecraft whilst it is being processed on Pad 39B at KSC. Image credit: NASA |
 |
AP10-69-H-574HR Crew being briefed on the emergency egress slide wire gondola at Pad 39B. (ALSJ) Image credit: NASA |
 |
AP10-69-H-575HR Crew inspect the emergency egress slide wire gondola at Pad 39B. (ALSJ) Image credit: NASA |
 |
AP10-69-H-576HR Crew inspect the underground bunker at the end of the emergency egress slide tube at Pad 39B. (ALSJ) Image credit: NASA |
 |
AP10-69-H-598HR Saturn V passes in front on the VAB on its journey to Pad 39-B at KSC. Image credit: NASA |
 |
AP10-69-H-649 part John Young at official portrait shoot. Image credit: NASA |
 |
AP10-69-H-650 Thomas Stafford & Eugene Cernan training in the LM simulator. (ALSJ) Image credit: NASA |
 |
AP10-69-H-651 John Young training in the CM simulator. (ALSJ) Image credit: NASA |
 |
AP10-69-H-652 John Young training in the CM simulator. (ALSJ) Image credit: NASA |
 |
AP10-69-H-653 Eugene Cernan adjusting audio headset whilst standing outside the LM simulator. (ALSJ) Image credit: NASA |
 |
AP10-69-H-758 John Young (left) and Tom Stafford head for the elevator and the transfer van which will take Gene Cernan and them out to the Pad for the Countdown Demonstration Test. (ALSJ) Image credit: NASA |
 |
AP10-69-H-786 Thomas Stafford and John Young approaching the stairs leading up to the CM simulator. (ALSJ) Image credit: NASA |
 |
AP10-69-H-787 John Young referring to flight documentation between simulator training sessions. Image credit: NASA |
 |
AP10-69-H-788HR Saturn V sits on Pad 39B. Image credit: NASA |
 |
AP10-69-HC-119HR Saturn V during transfer from western doorway of the VAB enroute to Pad 39B. Image credit: NASA |
 |
AP10-69-HC-159 Saturn V approaches the left turn to Pad 39-B at KSC. Image credit: NASA |
 |
AP10-69-HC-309 Saturn V during transfer from western doorway of the VAB enroute to Pad 39B. Image credit: NASA |
 |
AP10-69-HC-378 Official crew portrait. Image credit: NASA |
 |
AP10-69-HC-506 John Young flexing his shoulders during suiting up. Image credit: NASA |
 |
Crew clowning around at official portrait shoot. Image credit: NASA |
 |
AP10-69P-151 Saturn V journey's along the crawlerway enroute to Pad 39B at KSC. Image credit: NASA |
 |
AP10-S1C-NOID S-IC first stage being transferred from the transport barge to the VAB following its arrival at KSC. Image credit: NASA |
 |
AP10-KSC-68C-7912 S-IC first stage is hoisted by crane in the transfer aisle of the VAB. Image credit: NASA |
 |
AP10-KSC-68-8685 S-IVB third stage is lowered atop the S-II second stage in the VAB. (ALSJ) Image credit: NASA |
 |
AP10-KSC-68C-8693 S-IVB third stage is lowered atop the S-II second stage in the VAB. Image credit: NASA |
 |
AP10-KSC-68C-285 S-II second stage on sea going barge passing through swing bridge enroute to KSC. Image credit: NASA |
 |
AP10-KSC-69C-1983 Saturn V journey's along the crawlerway enroute to Pad 39B at KSC. (ALSJ) Image credit: NASA |
 |
AP10-KSC-69P-58 CSM/LM/SLA combination is lowered into place atop the S-IVB/IU in the VAB. Image credit: NASA |
 |
AP10-KSC-69P-167 John Young grinning at the cartoon character 'Charlie Brown', complete with CSM. (ALSJ) Image credit: NASA |
 |
AP10-KSC-69P-240 Crew posing on Pad 39B in front on the space vehicle which is enshrouded by the MSS. Image credit: NASA |
 |
AP10-KSC-69P-260 Eugene Cernan adjusting audio headset whilst standing outside the LM simulator. Image credit: NASA |
 |
AP10-KSC-69P-287 John Young sitting in comfortable reclining chair in the suiting up room at KSC. Image credit: NASA |
 |
AP10-KSC-69PC-30HR CSM/LM/SLA combination is transferred by crane in the VAB transfer aisle prior to stacking. Image credit: NASA |
 |
AP10-KSC-69PC-72 Saturn V/spacecraft stack leaving the VAB via the western doors enroute to Pad 39B at KSC. Image credit: NASA |
 |
AP10-KSC-69PC-73 Saturn V/spacecraft stack passing the north side of the VAB enroute to Pad 39B at KSC. (ALSJ) Image credit: NASA |
 |
AP10-KSC-69PC-109 Saturn V/spacecraft stack passing the north eastern corner of the VAB enroute to Pad 39B at KSC. (ALSJ) Image credit: NASA |
 |
AP10-KSC-69PC-110 Saturn V/spacecraft stack passing the north eastern corner of the VAB enroute to Pad 39B at KSC. Image credit: NASA |
 |
AP10-KSC-69PC-128 The Apollo 10 space vehicle sits on Pad 39B at KSC. Image credit: NASA |
 |
AP10-KSC-69PC-131 Saturn V upon its arrival at Pad 39B atop the MLA/Crawler. Image credit: NASA |
 |
AP10-KSC-69PC-147 Official portrait of CDR Thomas Stafford in front of the Apollo 10 Saturn V at Pad 39B. (ALSJ) Image credit: NASA |
 |
AP10-KSC-69PC-148 Official portrait of LMP Eugene Cernan in front of the Apollo 10 Saturn V at Pad 39B. (ALSJ) Image credit: NASA |
 |
AP10-KSC-69PC-149 Official portrait of CMP John Young in front of the Apollo 10 Saturn V at Pad 39B. (ALSJ) Image credit: NASA |
 |
AP10-KSC-69PC-150 Crew pose in front of the Apollo 10 Saturn V on Pad 39B at KSC. (ALSJ) Image credit: NASA |
 |
AP10-KSC-69PC-181 Apollo 10/Saturn V space vehicle on Pad 39B at KSC. (ALSJ) Image credit: NASA |
 |
AP10-KSC-69PC-193 Crew walking to transfer van at KSC. Image credit: NASA |
 |
AP10-KSC-69PC-204 Apollo 10/Saturn V space vehicle on Pad 39B at KSC. (ALSJ) Image credit: NASA |
 |
AP10-KSC-69PC-304 Apollo 10/Saturn V space vehicle enroute to Pad 39B as seen across the barge turning basin at KSC. (ALSJ) Image credit: NASA |
 |
AP10-KSC-69PC-1925 Apollo 10/Saturn V space vehicle sitting on Pad 39B at KSC, about to be enshrouded by the MSS. Image credit: NASA |
 |
AP10-ONPAD-NOID Apollo 10/Saturn V space vehicle on Pad 39B at KSC. Image credit: NASA |
 |
AP10-ROLLOUT-NOID Apollo 10/Saturn V space vehicle enroute to Pad 39B at KSC. Image credit: NASA |
 |
AP10-S68-15952 Apollo 10 practice in a simulator. Image credit: NASA |
 |
AP10-S68-15979 John Young training in CM simulator. Image credit: NASA |
 |
AP10-S68-41683 Apollo 10 crew practicing CM egress in a water tank at JSC. Image credit: NASA |
 |
AP10-S68-41685 Apollo 10 crew practicing CM egress in a water tank at JSC. Image credit: NASA |
 |
AP10-S68-41882 Apollo 10 commander during practice for recovery at sea. Image credit: NASA |
 |
AP10-S68-42906 Apollo 10 crew pose during water egress training. Image credit: NASA |
 |
AP10-S68-42908 Suit engineers assist the Apollo 10 crew during water egress training at JSC. Image credit: NASA |
 |
AP10-S68-55034 S-IC first stage during pre-stacking processing in the VAB. (ALSJ) Image credit: NASA |
 |
AP10-S69-17807 LM 'Snoopy' being lowered into position in the SLA, during pre-flight processing in the VAB. (ALSJ) Image credit: NASA |
 |
AP10-S69-17809 LM 'Snoopy' in position in the SLA, during pre-flight processing in the VAB. (ALSJ) Image credit: NASA |
 |
AP10-S69-17810 LM 'Snoopy' during pre-stacking processing in the VAB low bay area. (ALSJ) Image credit: NASA |
 |
AP10-S69-19190 CSM 'Charlie Brown' during pre-flight testing. Image credit: NASA |
 |
AP10-S69-19197 CSM 'Charlie Brown' during pre-flight testing. Image credit: NASA |
 |
AP10-S69-19203 CSM/LM/SLA combination being lowered into place atop the S-IVB/IU in the VAB. Image credit: NASA |
 |
AP10-S69-25979 The ascent stage of Lunar Module-4 is moved from work stand into altitude chamber in the Kennedy Space Center's Manned Spacecraft Operations Building. December 1968. Image credit: NASA |
 |
AP10-S69-27089 The Mobile Service Structure (MSS) being moved alongside the spacecraft as it sits on Pad 39B at KSC. 11 March 1969. Image credit: NASA |
 |
AP10-S69-27462 The Apollo 10 space vehicle leaves the Vehicle Assembly Building on its way to Pad 39B, Launch Complex 39, Kennedy Space Center. 11 May 1969. Image credit: NASA |
 |
AP10-S69-27741 Aerial view at Launch Complex 39, Kennedy Space Center, showing the Apollo 10 space vehicle on its way to Pad 39B. The Vehicle Assembly Building is in the background. 11 March 1969. Image credit: NASA |
 |
AP10-S69-27915 Aerial view at Launch Complex 39, Kennedy Space Center, showing a close-up of the Apollo 10 space vehicle on its way to Pad 39B. 11 March 1969. Image credit: NASA |
 |
AP10-S69-27916 Aerial view at Launch Complex 39, Kennedy Space Center, showing the Apollo 10 space vehicle on its way to Pad 39B. 11 March 1969. Image credit: NASA |
 |
AP10-S69-30248 Crew in front of Saturn V launch vehicle at Pad 39B. (ALSJ Image credit: NASA |
 |
AP10-S69-30250 Apollo 10 CMP John Young, wearing a protective hat, participates in pad egress training at the Kennedy Space Center's Pad 39B during preparations for the scheduled Apollo 10 lunar orbit mission. 27 March 1969. Image credit: NASA |
 |
AP10-S69-30251 Apollo 10 LMP Eugene Cernan, wearing a protective hat, participates in pad egress training at the Kennedy Space Center's Pad 39B during preparations for the scheduled Apollo 10 lunar orbit mission. 27 March 1969. Image credit: NASA |
 |
AP10-S69-30252 Apollo 10 CDR Thomas Stafford, wearing a protective hat, participates in pad egress training at the Kennedy Space Center's Pad 39B during preparations for the scheduled Apollo 10 lunar orbit mission. 27 March 1969. Image credit: NASA |
 |
AP10-S69-30520 A North American Rockwell Corporation artist's concept depicting the Apollo 10 Lunar Module descending to 50,000 feet for a close look at a lunar landing site. April 1969. Image credit: NASA |
 |
AP10-S69-32035 Astronaut John W. Young, Command Module Pilot of the Apollo 10 prime crew, is seen at a press conference held at the Manned Spacecraft Center on 26 April 1969. Image credit: NASA |
 |
AP10-S69-32036 Astronaut Thomas P. Stafford, commander of the Apollo 10 prime crew, is seen at a press conference held at the Manned Spacecraft Center on 26 April 1969. Image credit: NASA |
 |
AP10-S69-32037 Astronaut Eugene A. Cernan, Lunar Module Pilot of the Apollo 10 prime crew, along with mascot the cartoon character 'Snoopy', is seen at a press conference held on 26 April 1969 at the Manned Spacecraft Center. Image credit: NASA |
 |
AP10-S69-32613 Apollo 10 prime crew pose for offical PR photograph. April 1969. Image credit: NASA |
 |
AP10-S69-32615 CDR Thomas Stafford (background) and LMP Eugene Cernan training in the LM simulator at KSC. April 1969. Image credit: NASA |
 |
AP10-S69-32787 LMP Eugene Cernan (nearest camera) and CDR Thomas Stafford training in the LM simulator at KSC. 3 April 1969. Image credit: NASA |
 |
AP10-S69-32788 CMP John Young practicing solo operations in the CM simulator at KSC. 3 April 1969. Image credit: NASA |
 |
AP10-S69-32789 CMP John Young practicing solo operations in the CM simulator at KSC. 3 April 1969. Image credit: NASA |
 |
AP10-S69-33765 Artist's concept depicting the firing of the Apollo 10 Lunar Module descent engine for 42 seconds to propel 'Snoopy' back into a higher lunar orbit for rendezvous and docking with the Command and Service Modules. Earlier, the LM descent engine would be fired for 27 seconds to take astronauts Thomas P. Stafford, Apollo 10 commander; and Eugene A. Cernan, Lunar Module Pilot, to within 10 miles of the Moon's surface. Astronaut John W. Young, Command Module Pilot, will remain in the Command Module, 'Charlie Brown,' in lunar orbit. Developed by TRW's Systems Group at Redondo Beach, California, under Grumman subcontract, the throttleable descent engine was used to soft land LMs on the lunar surface during Apollo 11 and subsequent Apollo missions. 12 May 1969. Image credit: NASA |
 |
AP10-S69-33853 Ground-level view of the Apollo 10 space vehicle on Pad B, Launch Complex 39, Kennedy Space Center, Florida. This photograph of the Apollo/Saturn V stack was taken during Countdown Demonstration Test (CDDT) activity. 4 May 1969. Image credit: NASA |
 |
AP10-S69-33854 Aerial view of the Apollo 10 space vehicle on Pad B, Launch Complex 39, Kennedy Space Center. This photograph of the Apollo/Saturn V stack was taken during pull back of the Mobile Service Structure. The White Room can be seen to the right of the CM. 4 May 1969. Image credit: NASA |
 |
AP10-S69-33855 Night time, ground-level view of the Apollo 10 space vehicle on Pad B, Launch Complex 39, Kennedy Space Center. This photograph of the Apollo/Saturn V stack was taken during pull back of the Mobile Service Structure. 4 May 1969. Image credit: NASA |
 |
AP10-S69-34038 View of activity at the Flight Director's console in the Mission Operations Control Room in the Mission Control Center, Building 30, on the first day of the Apollo 10 lunar orbit mission. Seated are Flight Directors Gerald D. Griffin (foreground) and Glynn S. Lunney, Shift 1 (Black Team). Milton L. Windler, standing behind them, is the Flight Director of Shift 2 (Maroon Team). In the center background, standing, is Dr. Christopher C. Kraft Jr., MSC Director of Flight Operations. 18 May 1969. Image credit: NASA |
 |
AP10-S69-34039 Overall view of activity in the Mission Operations Control Room in the Mission Control Center, Building 30, on the first day of the Apollo 10 lunar orbit mission. This picture was taken following CSM/LM-S-IVB separation, and prior to LM extraction from the S-IVB. The telecast from the Apollo 10's color TV camera shows the LM still attached to the S-IVB. The CSM is making the docking approach to the LM/S-IVB. 18 May 1969. Image credit: NASA |
 |
AP10-S69-34040 Partial view of activity in the Mission Operations Control Room in the Mission Control Center, Building 30, on the first day of the Apollo 10 lunar orbit mission. The television monitor shows a picture of Earth made during the second telecast from the Apollo 10's color TV camera. CapCom Charlie Duke seated in foreground. Notice the 'Snoopy' and 'Charlie Brown' cartoon characters standing on the console in front of Duke. 18 May 1969. Image credit: NASA |
 |
AP10-S69-34314 Replicas of Snoopy and Charlie Brown, the two characters from Charles Schulz's syndicated comic strip, "Peanuts," decorate the top of a console in the Mission Operations Control Room in the Mission Control Center, Building 30, on the first day of the Apollo 10 lunar orbit mission. CapCom Charlie Duke seated in foreground. 18 May 1969. Image credit: NASA |
 |
AP10-S69-34316 Overall view of the Mission Operations Control Room in the Mission Control Center, Building 30, on the first day of the Apollo 10 lunar orbit mission. A color television transmission was being received from Apollo 10. This picture was made following Command Service Module/Lunar Module/Saturn IVB (CSM/LM-S-IVB) separation and prior to LM extraction from the S-IVB. The CSM was making the docking approach to the LM/S-IVB. 18 May 1969. Image credit: NASA |
 |
AP10-S69-34318 Ground-level view at sunset of the Apollo 10 space vehicle at Pad B, Launch Complex 39, Kennedy Space Center. The Apollo 10 stack had just been positioned after being rolled out from the Vehicle Assembly Building. 11 March 1969. Image credit: NASA |
 |
AP10-S69-34319 The 363-feet tall Apollo 10 space vehicle on the way from the Vehicle Assembly Building to Pad B, Launch Complex 39, Kennedy Space Center. The Saturn V stack and its mobile launch tower are atop a crawler-transporter. 11 March 1969. Image credit: NASA |
 |
AP10-S69-34320 Ground level view of the Apollo 10 space vehicle on Pad B, Launch Complex 39, Kennedy Space Center. The Mobile Service Structure is in the right foreground. 17 May 1969. Image credit: NASA |
 |
AP10-S69-34327 Aerial, high-angle, view of the Apollo 10 space vehicle at Pad B, Launch Complex 39, Kennedy Space Center, Florida. 13 May 1969. Image credit: NASA |
 |
AP10-S69-34328 Ground level view of the Apollo 10 space vehicle on Pad B, Launch Complex 39, Kennedy Space Center. 17 May 1969. Image credit: NASA |
 |
AP10-S69-34329 The prime crew of the Apollo 10 lunar orbit mission pose for a photograph while at the Kennedy Space Center for preflight training. Left to right are astronauts Eugene A. Cernan, Lunar Module Pilot; John W. Young, Command Module Pilot; and Thomas P. Stafford, Commander. In the left background is the Apollo 10 space vehicle on Pad B, Launch Complex 39, Kennedy Space Center. The three crewmen had just completed a Countdown Demonstration Test exercise. 13 May 1969. Image credit: NASA |
 |
AP10-S69-34330 Astronaut Thomas P. Stafford, Apollo 9 Commander, is suited up at the Kennedy Space Center for a Countdown Demonstration Test during preparations for the scheduled Apollo 10 lunar orbit mission. 13 May 1969. Image credit: NASA |
 |
AP10-S69-34332 Overall view of Firing Room 3 of the Launch Control Center, Launch Complex 39, Kennedy Space Center, Florida, during an Apollo 10 Countdown Demonstration Test. 13 May 1969. Image credit: NASA |
 |
AP10-S69-34333 The three Apollo 10 astronauts suit up for a Countdown Demonstration Test at the Kennedy Space Center during preparations for their scheduled lunar orbit mission. From front to rear, are Thomas P. Stafford, Commander; John W. Young, Command Module Pilot; and Eugene A. Cernan, Lunar Module Pilot. 13 May 1969. Image credit: NASA |
 |
AP10-S69-34334 Astronaut Eugene A. Cernan, Apollo 10 Lunar Module Pilot, is suited up at the Kennedy Space Center for a Countdown Demonstration Test. 13 May 1969. Image credit: NASA |
 |
AP10-S69-34385 The prime crew of the Apollo 10 lunar orbit mission. Left to right, are Eugene A. Cernan, Lunar Module Pilot; John W. Young, Command Module Pilot; and Thomas P. Stafford, Commander. In the background is the Apollo 10 space vehicle on Pad B, Launch Complex 39, Kennedy Space Center, Florida. May 1969. Image credit: NASA |
 |
AP10-S69-34482 Astronaut John W. Young, Apollo 10 Command Module Pilot, jokes with Donald K. Slayton (standing left), director of Flight Crew Operations, Manned Spacecraft Center, during Apollo 10 suiting up operations. On couch in background is astronaut Eugene A. Cernan, Lunar Module Pilot. 18 May 1969. Image credit: NASA |
 |
AP10-S69-34483 A technician attaches hose from test stand to spacesuit of astronaut John W. Young, Apollo 10 Command Module Pilot, during final suiting operations for the Apollo 10 lunar orbit mission. Another technician makes adjustment behind Young. Minutes later astronauts Young; Thomas P. Stafford, Commander; and Eugene A. Cernan, Lunar Module Pilot, rode a transfer van from the Kennedy Space Center's Manned Spacecraft Operations Building over to Pad B, Launch Complex 39, where their spacecraft awaited them. Liftoff was at 12:49 pm (EDT), 18 May 1969. Image credit: NASA |
 |
AP10-S69-34485 Astronaut John W. Young, Apollo 10 Command Module Pilot, adjusts strap on his communications cap during suiting up operations for the lunar orbit mission. 18 May 1969. Image credit: NASA |
 |
AP10-S69-34574 CapCom Charlie Duke standing at his console in the MOCR during the flight. Cartoon character figures, 'Charlie Brown' and 'Snoopy' can be seen on the console. Image credit: NASA |
 |
AP10-S69-34603 CapCom Charlie Duke and Deke Slayton in the MOCR during flight. (ALSJ) Image credit: NASA |
 |
AP10-S69-35316 Interior view of the White Room at Pad B, Launch Complex 39, Kennedy Space Center, during the Apollo 10 prelaunch countdown. When this picture was taken the Apollo 10 crew had already been inserted into the spacecraft, and final checks were being made prior to closing of the hatch. 18 May 1969. Image credit: NASA |
 |
AP10-S69-35317 Interior view of the White Room at Pad B, Launch Complex 39, Kennedy Space Center, showing preparations being made for insertion of the Apollo 10 crew into their spacecraft during the prelaunch countdown. In the background is astronaut Thomas P. Stafford, Commander. Astronaut Eugene A. Cernan, Lunar Module Pilot, is in right foreground. 18 May 1969. Image credit: NASA |
 |
AP10-S69-35502 Astronaut Eugene A. Cernan (left), Lunar Module Pilot of the Apollo 10 lunar orbit mission, confers with astronaut Edwin E. Aldrin Jr. during an Apollo 10 postflight de-briefing session. Aldrin is the Lunar Module Pilot of the Apollo 11 lunar landing mission. June 1969. (ALSJ) Image credit: NASA |
 |
AP10-S69-35503 Astronaut Eugene A. Cernan (left), Lunar Module Pilot of the Apollo 10 lunar orbit mission, confers with astronaut Edwin E. Aldrin Jr. during an Apollo 10 postflight de-briefing session. Aldrin is the Lunar Module Pilot of the Apollo 11 lunar landing mission. June 1969. Image credit: NASA |
 |
AP10-S69-35504 The prime crews of the Apollo 10 lunar orbit mission and the Apollo 11 lunar landing mission are photographed during an Apollo 10 postflight de-briefing session. June 1969 Image credit: NASA |
 |
AP10-S69-35505 The prime crews of the Apollo 10 lunar orbit mission and the Apollo 11 lunar landing mission are photographed during an Apollo 10 postflight de-briefing session. Clockwise, from left foreground, are astronauts Michael Collins, Apollo 11 Command Module Pilot; Edwin E. Aldrin Jr., Apollo 11 Lunar Module Pilot; Eugene A. Cernan, Apollo 10 Lunar Module Pilot; Thomas P. Stafford, Apollo 10 commander; Neil A. Armstrong, Apollo 11 commander; and John W. Young, Apollo 10 Command Module Pilot. June 1969. Image credit: NASA |
 |
AP10-S69-35507 The prime crews of the Apollo 10 lunar orbit mission and the Apollo 11 lunar landing mission are photographed during an Apollo 10 postflight de-briefing session. June 1969. Image credit: NASA |
 |
AP10-MSS-NOID Mobile Service Structure (MSS) being withdrawn by the crawler from its position enshrouding the spacecraft and launch vehicle at Pad 39B. Image credit: NASA |
 |
Crew Portrait Image credit: NASA |
 |
Crew pre-flight briefing with Jack Schmitt. Image credit: NASA |
 |
Crew pre-flight briefing with Jack Schmitt. Image credit: NASA |
 |
John Young leads the Apollo 10 crew out to the transfer van. Image credit: NASA |